
How to Make a Welded Sliding Driveway Gate
Welded sliding gates normally have a metal frame regardless of the cladding. The frame is made from either Aluminium Square Hollow Section (SHS) or Square Steel Rolled Hollow Section (RHS). The bottom rail is normally wider to provide better bracing and support for a sliding gate.
Components needed are:
Notes:
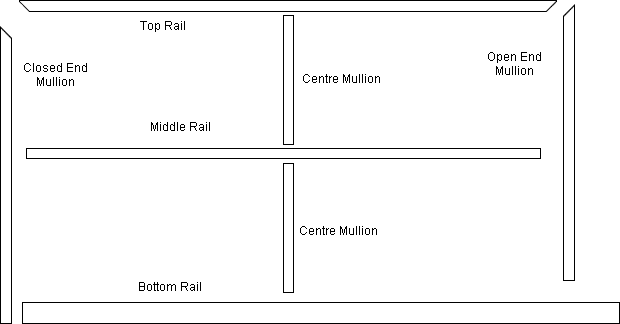
- The Centre Mullions are only necessary for gates with timber pickets, hardwood slats, metal slats or metal sheets fitted to the front of the gate. The centre mullions help stiffen the gate up as well as provide something for horizontal timber or metal sheeting to be screwed to.
- For gates with metal tubing welded to the frame center mullions are NOT necessary.
- Middle rails are only necessary for gates higher than 1.2m (4') and have either vertical pickets, slats or sheeting fitted to the front.
- If a Guide rail and Block Guide system is used then a guide rail needs to be welded or screwed to the back of the top or middle rail of the gate.
- The closed end mullion butts onto the end of the bottom rail so it caps the bottom rail as well is provides good bracing.
- Mitred corners for the top rail are neat, require no caps and provide good bracing.
- The open end mullion should butt onto the top of the bottom rail as the bottom rail needs to extend out an extra 400mm (16") normally to allow for an automatic gate operator.
For Bi-Parting Gates you make two frames the same but the extended bottom rail on opposite sides and half the width of a single panel gate
READ MORE about Bi-Parting Gates
For Telescopic Gates you make one with an extended bottom rail like a single panel gate except half the width and a second panel with no extended bottom rail. You also need a return.
READ MORE about Telescopic Gates
Material Type, Size and Cutting.
The common size of material used for gate frames is 40mm (1 1/2") or 50mm (2") square hollow section with a 1.6mm (1/16") wall thickness if pre-galvanised steel or 3mm (1/8") if aluminium or steel that is to be galvanised after the gate is made.
The bottom rails is normally 40mm (1 1/2") x 80mm (3") rectangular hollow section with the same wall thickness as above.
You can cut Aluminium using a Drop saw with an Aluminium blade fitted, which will also allow accurate mitres to be cut (45o cut). For steel you will need either a special metal cutting drop saw or an angle grinder with the thin metal cutting discs will still work just take a little longer and is fiddly.
Width of the Gate Frame
Normally a sliding gate should be wide enough so it will overlap the posts by 50mm (2") each side, which looks the nicest and fills in the gap on each side to some degree although how much depends on how far the gate sits behind the posts, which depends on the guide system used.
Height of the Gate Frame
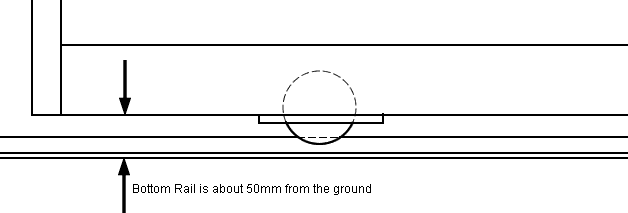
For gates with vertical timber palings or slats fitted to the front the frame should have the top rail lower than the palings or slats, otherwise the top rail is at the very top of the gate. The gate will sit about 50mm (2") off the ground allowing for the gate track and wheels set up into the bottom rail.
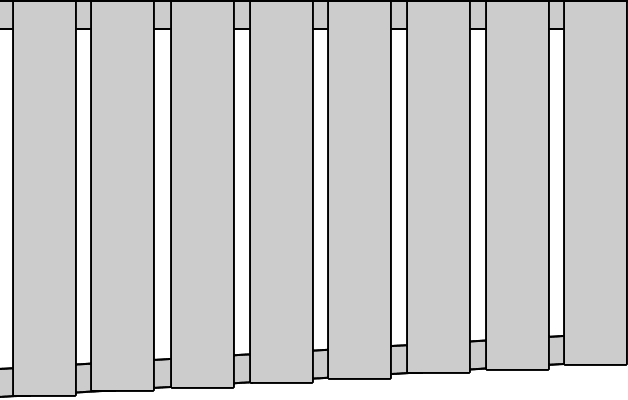
Rake Gate for Sloping Ground
If the driveway has slope across it (camber) more than 25mm (1") then its a good idea to consider raking the bottom rail and possibly the top rail too.
READ MORE more about Sliding Gates on Sloping or Uneven Ground
It's important to measure the slope of your driveway every one metre or so to allow for any rises or dips so when the gate is completed the ends of your gate will be plumb and you can make sure the bottom rail doesn't contact the track at all.
READ MORE about Measuring up a Sliding Gate
If you do need to rake your gate then it's best to draw the profile of your driveway to scale from your measurements on paper or with your favourite CAD program. Then draw your gate allowing the bottom rail to be 50mm (2") above the ground where the wheels are to get the correct angle and rise of the gate.
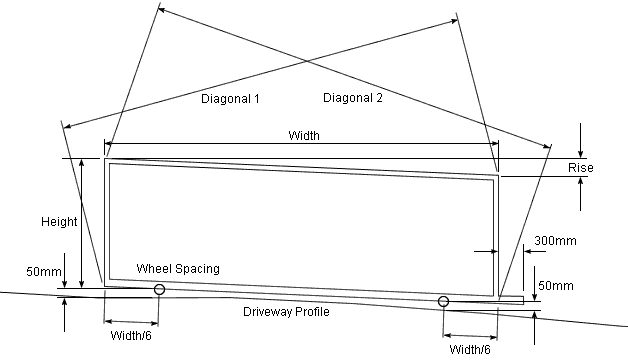
To find the angle either measure it on your drawing or use some math: Angle = COS Rise/Width
The Angle is handy for cutting the material so if fits snugly making welding a lot easier because you don't need to fill in any gaps. The Mitred corners for raked top rails need to have half the angel added or subtracted to get this correct too. Best to right all this down on the drawing before you start cutting other wise it can get very confusing and mistakes are made.
The Diagonals are necessary to make sure your gate is the right shape when welding together otherwise the end mullions may end up out of plumb. You can measure the diagonals off your drawing or use some math:
Diagonal 1 = square root of (Height2 + Width2)
Diagonal 2 = square root of ((Height + Rise)2 + Width2)
Holes Drilled or Cut before welding
Its easier to cut holes for the wheels before the frame is welded together. The wheel nearest the extended bottom rail should be placed relative to the mullion not the end of the bottom rail extension so the weight of the gate is balanced correctly. The wheel holes can be cut with an angle grinder with a small blade so it can cut deeper in the corners.
If your gate will have round vertical tubing fitted inside the frame then you should drill holes for these in the frame before welding, as this is quicker than fitting them all carefully inside the frame. If you have a middle rail the alignment of the holes is much more critical so you can slide them through.
Once you have all the components of your gate cut out and holes drilled (if needed) it's time to weld the frame together. If all you have is a small stick welder this will do the job although takes a little longer than a MIG welder because you need to chip the slag off but the end result can be just as good. If you choose to use Aluminium for your frame you can weld aluminium with a stick welder by buying Aluminium Rods.
If you have no welding experience it's not something you can pick up playing around on a Sunday afternoon you will need someone with experience to show you how to weld and need to practice on some scrap material first before attempting to weld a gate together. Welding classes are a good idea.
It's best to lay all the components out on a flat surface so they line up exactly with each other. If the surface you're laying them out on is uneven you can use small timber wedges to even it out and make sure it is all flat.
Welding the Frame Together
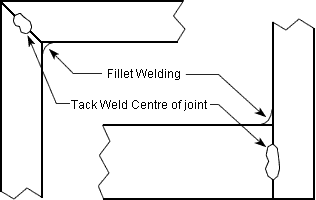
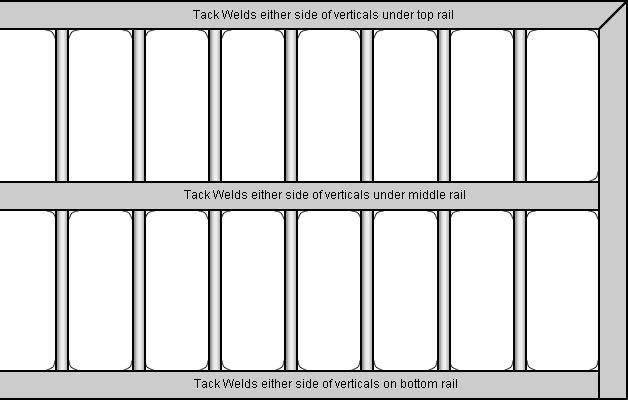
Tack the gate together first don't do full welds to start with because the heat will pull the whole frame out of shape, always tack weld in the middle of the join first as this will be strong enough to hold the frame together to begin with and allows the full weld to be done neatly after. Its important to make sure the frame is sitting flat.
If your gate will have round tubing fitted for cladding and you have a middle rail don't weld the bottom rail in to begin with otherwise you won't be able to slide the tubes in place.
If your gate has NO rake make sure the diagonal measurements are the same so your frame will be square. Also check the width and height.
If your gate has a raked bottom rail or both top and bottom rails are raked check the diagonal measurements acquired earlier after tacking as you can still adjust it before any serious welding is done.
Once you have finished tacking and checking measurements turn the frame over and weld the full length of the joins on the other side making sure you are penetrating the metal properly. If in doubt as to how well you are penetrating use some off cuts first and look inside the hollow material, if you are NOT penetrating well you won't see any melt marks inside, if you are then you will.
Turn the frame back over and finish the welds on the first side. This will see that the frame holds it shape.
Then stand the frame up on the bottom rail holding it with something and do the fillet welds for the tops of all the rails as well as the outside mitred corners of the top rail. For butt welds and the outside edges of a mitred corner you will need to weld more quickly to avoid blowing holes in the material that can be a lot of fiddling about to fill in.
Lastly stand the frame upside down on the top rail and fillet weld the underside of all the rails. Its important to weld all the way around each joint carefully as this is what braces and stiffens the gate, if not strong enough the welds may crack and the gate fall apart.
Dressing the Welds
If you have made nice neat fillet welds they generally don't need to be dressed (sanded smooth) but the butt welds on the front and back faces of the gate and the outer edges of a mitred corner look nicer if they are dressed. You will need an angle grinder to dress your welds using a flapper disc, which is made from lots of strips of sand paper layered at an angle so as they wear out fresh sand paper becomes ready for use. A cheap 100mm (4") angle grinder will do the job although a 125mm (5") angle grinder with at least a 1400 Watt motor will be much faster and is what the professionals use.
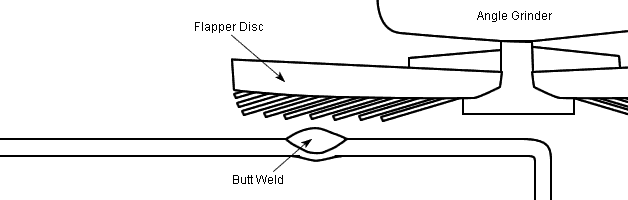
A new flapper disc can also get into tight corners although a metal grinding disc may do so better if need be.
You can get different grades of flapper disc generally a 40 grit will cut faster but doesn't leave as finer finish as 80 Grit. It's faster to use 40 grit to begin with to get the bulk of the material off then change to an 80 grit for the finishing then use an orbital sander with 80 grit for the final finish.
Insetting Tubular Round Verticals
If a sliding gate is to have round tubing verticals set inside the frame then it's quicker to drill holes in the frame before welding the frame together then slide the verticals into the holes and tack weld either side. If there's a middle rail it makes a neater job if the verticals are slipped through the middle rail and tacked on the bottom of the middle rail only. The bottom rail should not be welded until the verticals have been fitted as they will need to slide in from the bottom through the middle rail.
To get spacing for the verticals so they fit evenly into the frame take the distance between the inside of the mullions and divide this by the distance you want between centers of the verticals. This will give you the number of gaps between verticals. Then if you take the distance between mullions and divide it by the number of gaps you will get the exact distance between verticals to get them to fit in nicely. Then make a list of the distances each vertical center is from one end of the gate by adding the distance between vertical to the width of the frame for centre of the first vertical than add the same distance to this for the second vertical and repeat adding for each other vertical. The number of verticals is the number of gaps less one.
Measuring the position of each vertical from one end is much more accurate than measuring between each vertical, because each time you measure between verticals any error will be added to the next measurement so by the time you get to the end you could be quite a way out and the last vertical may be too close or too far from the mullion.
For Square or Rectangular Verticals set into the Gate Frame
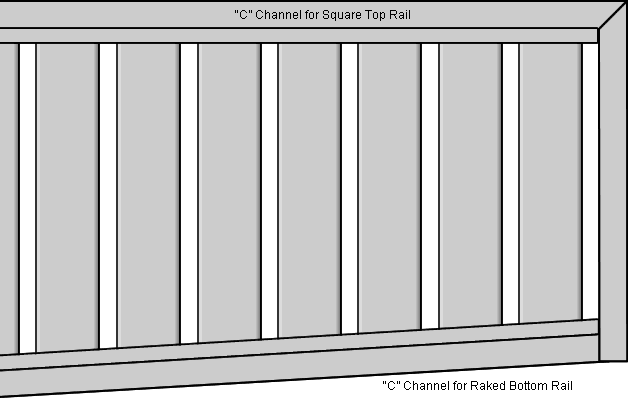
If the gate is to have square or rectangular verticals set into the frame then it's quicker to fit "C" shaped channels inside the top and bottom rails and middle rail if exists then the verticals can be slipped into the channels and riveted in place. This way the verticals don't need to cut extremely accurately and if the gate is raked then the verticals can still be cut square otherwise trying to cut angles and fit them accurately inside the frame can be very time consuming. Also by riveting the verticals in this you can have them a different colour to the frame.
To get the exact gap between these so they fit evenly into the frame take the distance between the inside of the mullions and divide this by the width of the verticals + the gap you want and this will give the number of verticals. Now multiply the number of verticals by the width of the verticals to find out how much space they will take up in total. Then subtract this from the total distance between mullions to get the total gap space and divide this by the number of verticals + one to get the exact gap. Then make a list of the distances each verticals edge is from one end of the gate by adding the gap to the width of the frame for first edge of the first vertical than add the gap + width of vertical to this for the second vertical and repeat adding this for each other vertical.
Measuring the position of each vertical from one end is much more accurate than measuring between each vertical, because each time you measure between verticals any error will be added to the next measurement so by the time you get to the end you could be quite a way out and the last vertical may be too close or too far from the mullion.
For Verticals fitted to the Front Face of the Gate
If the gate is to have round, square of rectangular metal verticals fitted to the front of a gate frame (face mounted) then it's quicker to lay them all out on a flat surface, place the frame on top, align all the verticals to the frame then weld them in place from the back of the gate so the welds aren't seen from the front.
If the gate is to have timber palings, these can simply be screwed on the front and square or rectangular timber battens that are thick enough can be screwed from the back so the screws aren't seen, although angles will need to be fitted to the frame for these screws.
To get the exact gap between these so they fit neatly onto the frame divide the width of each vertical + the gap you want from the width of the gate to get the number of verticals. Then multiply this number by the width of the vertical to fins out how much space they all need. Subtract this total from the width of the gate to get the total amount of space for the gaps then dive this by the number of verticals less one to get the exact gap. Then make a list of the distances each verticals edge is from one end of the gate, with vertical is lined up with the edge, the second is the width of a vertical + gap, then each vertical after this will be the previous one + the width of the vertical + the gap.
Measuring the position of each vertical from one end is much more accurate than measuring between each vertical, because each time you measure between verticals any error will be added to the next measurement so by the time you get to the end you could be quite a way out and the last vertical may be too close or too far from the mullion.